
👉 Start Your Free Membership Trial: Become a BetterSax Member
The Saxophone Scale Exercise That Will Increase Your Finger Speed
Most sax players find scale exercises boring. But what if you played them four different ways? Yeah… that’s even more boring, but it’s also the thing that’ll free up your slow and stiff fingers.
So, in this video, I’m going to show you the practice method most people skip that will get your fingers moving fast and smooth across the saxophone keys.
The Four Directions method in this video comes directly out of the new BetterSax course by Adam Larson, titled Practice Makes Perfect.
In this course, Adam covers how to build a strong and beautiful saxophone sound, how to increase your finger speed and control, and how to apply what you’ve learned to improvised solos.
Right now, we’re offering a free trial of the BetterSax membership, where you can access all of Adam’s courses, plus dozens of others from teachers like myself, Eric Alexander, and Vincent Herring. For now, I’ll let Adam explain how the four directions work.
Adam Larson’s Direction #1
Start by go through the four directions with thirds. Play the exercise down below in two octaves.

When we say up, we’re referring to the direction the first interval moves in. We go from C up a third to E. Then we go from D, the next note in the scale, up a third to F, and so on.
If you don’t already know this basic way of playing your major scale in thirds, you should learn it. But if we stop there, we just have a boring scale exercise that doesn’t get us very far. As soon as we apply the second direction, though, the work starts to pay off.
Adam Larson’s Direction #2
This time, the first interval goes down instead of up.

Notice how we start on the third note of the scale, the E, and then jump down a third to the root. Then we repeat this pattern for each note of the major scale, going up from there.
Once you’ve learned that, you’ve already doubled the effectiveness of the original boring exercise. But don’t stop there. The next two directions are the ones that really get your fingers moving fast and smooth.
Adam Larson’s Direction #3
The third direction combines up and down. First interval goes up a third, next one goes down.

You can see how this creates lines that sound more melodic and less like an exercise. Here is one last direction to practice to get ahead of 99% of other players who won’t bother.
Adam Larson’s Direction #4
This time we go down first, then up.

Never Run Out of Things to Practice
If you practice these four directions, you’ll never not know what to practice. You’ll have a lot of things that you can objectively be hitting in the shed when you practice.
Have you ever gone into the practice room, played a little bit and come out only to be like “what the heck did I actually practice?” This is a great way to combat that.
The Four Directions exercise allows you to formulate a plan before going into your practice session, like ” Today I’m going to work on this direction in these keys, and I’m going to do it at this BPM.”
As you start exploring this exercise, don’t try to do all four directions in all 12 keys and every single type of modality that you can think of right away, because this will lead to frustration and you won’t end up accomplishing much. Small gains are always going to be better than trying to shoot for the moon every single time you practice.
In order to be maximally efficient, I’d recommend starting in a hard key, D flat or B. If you want to give yourself a little break, start in C and go around the circle of fourths. For example, you may decide “Okay, today we’re doing thirds all up, and we’re going to do the first three keys, C, F, and B flat.”
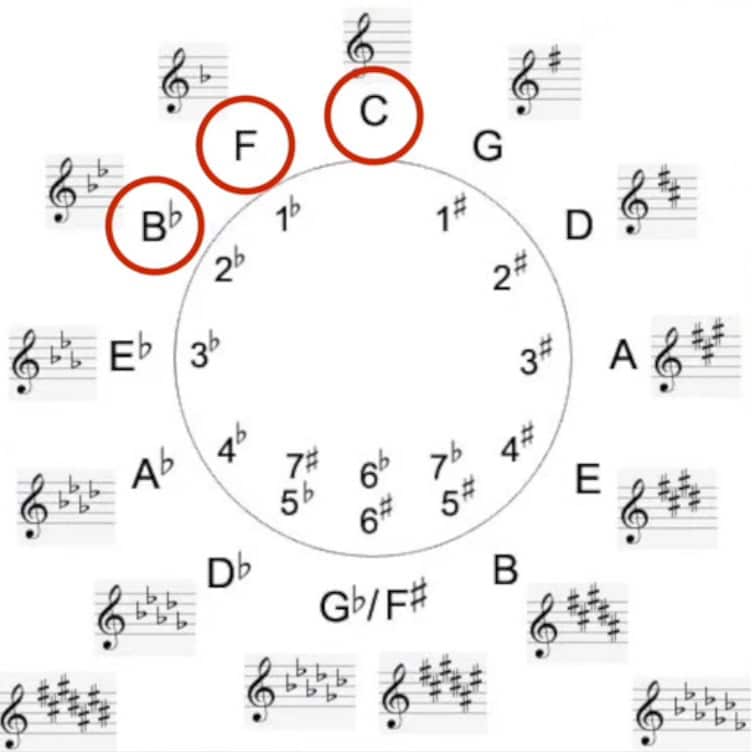
As you go through that and get it under your fingers, you might say, “Okay, I got a handle on that. Let me play the C, F, and B flat in a different direction.”
After some time on that exercise, you may decide “Let me work on the other side of the circle in just ascending version.”
This is the process of learning a new exercise. If you do this every single day, you’re going to notice that your technical facility will improve and the exercise variation that you practiced yesterday will feel easier.
If you play the bridge to Cherokee and you fold like a pancake, it’s not the chord changes fault, it’s our fault. The best way to get better at this is to confront these trouble spots in our own practice, and this is a great exercise to start.
Applying the 4 Directions to Saxophone Solos
Once you’ve practiced exercises using the four directions and you’ve got all that technique at your fingertips, it’s time to apply it to soloing.
Applying the exercises you practice to your improvised solos is the part that most saxophone players struggle with. But there’s an incredibly easy method that I’ve covered in the past that you can find here, Practice Improv Like This and You’ll Nail the Chord Changes. This will get you playing swinging lines that nail the chord changes every time.