

In this guest column from Terry Tomlin, we are going to depart from the usual format to explore some of the mechanical aspects of saxophone playing and doubling.
In short, we will present low-tech tips to make one’s life easier.
Terry Tomlin was the Director of Jazz Studies and Professor Emeritus of Saxophone at the University of Texas at Brownsville. He holds a Bachelor’s Degree from Olivet University, an M.M.ed. from Vandercook College in Chicago, an M.A. in Woodwinds from Eastern Illinois University with additional work at the University of Kansas and Berklee College of Music. He has traveled extensively with his University Jazz Band throughout the United States and Mexico. The band has won many awards at collegiate competitions.
Being mechanically minded he shares with us his 40 plus years of experience in this area.
Introduction
Growing up music was always very important to me, but I also had an interest in mechanics.
My grandfather was an inventor who owned a hardware store. My father was an electronics technician. My brothers and I were the typical “motor heads” constantly tinkering with our cars trying to make them faster.
It’s must be in my DNA not to leave well enough alone and try to improve the mechanical aspects of my equipment. The following are some tips that I have found useful for saxophonists and woodwind doublers.
Lip Cushion
Let’s start off with talking about the lip cushion.
All of us from time to time have felt the discomfort of a sore lower lip. Even though one is encouraged not to bite, the pressure of the lower teeth against the lip after a long practice session often results in soreness. This is especially the case when working on altissimo harmonics.
The old remedy of folding a small piece of paper and placing it over the lower lip is inconvenient. After a short time, the paper disintegrates and shreds.
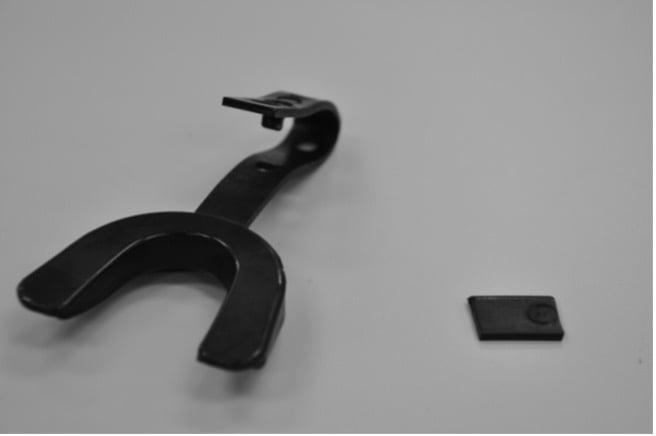
An inexpensive remedy is to make a custom lip cushion from a mouth guard. These mouth guards are commonly sold in the sports section of most big-box stores.
It is made by cutting an approximate 3/8 inch portion from the mouth guard, placing it between the tines of a fork, boiling for about 10 seconds, then rapidly forming it into place over the lower teeth. It usually takes several attempts to form the lip cushion to one’s liking.
The lip cushion never wears out but is sometimes lost.
For this reason, I recommend making several cushions in one setting. One word of caution regarding these cushions – don’t make the cushion too thin in an attempt to make it lightweight.
I once did this and accidentally inhaled it – DURING A PERFORMANCE! The subsequent onstage choking was not a high point in my career, though my imitation of a dog hacking up a bone provided some amusement for the audience.
Make Allowances for Low Light Situations
Often during and after a rehearsal or performance musicians must work in a poorly lit environment.
For example, the lighting in an orchestra pit is often very dim by design, while musicians on stage work in the entire spectrum of lighting from exceedingly bright to total darkness. Additionally, before and after the gig the lighting back stage may be less than desirable for assembling and disassembling equipment.
Improving your working conditions
To improve your conditions, I recommend packing a small flashlight as part of your equipment.
You can also alter your instrument stand. If you are a musician who doubles, you understand that the switching of instruments adds additional layers of stress to a performance.
The process goes somewhat as follows: place one instrument on its stand; retrieve a second instrument; check if there is a change of key or meter; watch the conductor for potential tempo changes; inaudibly warm the new instrument and adjust for a new embouchure; all while accurately counting rests.
To make this harrowing process a little easier, try narrowing the flute and clarinet peg tips. Simply whittle the top of the peg to a point and paint the tip white. This will make the switching of instruments easier, especially in a near dark situation.

Also if your clarinet has a tendency to stick to the peg, purchase some self-adhering felt pads and place them where the clarinet meets the peg. It’s very unnerving to try to dislodge a sticking clarinet from its stand. The felt pads solve this problem.

I also recommend attaching a silverware tray to your music stand for the purpose of holding pencils, mouthpiece caps, a metronome, and other accessories. If you are confident in the sturdiness of the stand, it may also be used to hold a piccolo.
It’s much easier to rapidly retrieve it from this tray than from a piccolo peg.

Mouthpiece Care & Caps
Mouthpiece & Reed Alignment
My next recommendation, is to paint a small dot on the back of your mouthpiece to assist in the alignment of the reed.
Most students take adequate effort to align the tip of the reed when placing it on the mouthpiece, but pay little attention to the alignment of the stock end of the reed.

A reed may appear to be perfectly aligned at the tip and be quite askew at the stock end. This greatly affects the response and tone of the reed. Once again, those musicians who double and need a quick reed change in performance will be greatly aided by this dot.
Snug Neck Cork
If you use more than one mouthpiece on your saxophone for various playing situations, you most likely have to deal with the problem of one mouthpiece fitting too snugly on the neck cork while the other is too loose. The common remedy of placing paper on the neck for the loose fitting mouthpiece is inconvenient.
Try placing electrical tape inside the bore of the loose fitting mouthpiece. Usually, it’s not necessary to place the tape around the entire inner circumference; a single strip about an inch along the inside bore will do the trick.
Keeping the Reed Moist
Place a small piece of wet sponge into the bottom of the mouthpiece cap to keep the reed moistened during long periods of disuse in a performance.
If you are a doubler, you have experienced the problem of trying to play on a cold instrument that has been sitting for a long period of time. Big band saxophonists and woodwind pit musicians often must play on a cold instrument with a dry reed at a moment’s notice.
The wet sponge will keep the reed moist for hours without over soaking it. Care should be taken to thoroughly dry the sponge between playing sessions. A moist sponge stored in a dark instrument case becomes quite unsanitary. Rinsing it in hot water and drying it in sunlight is a good practice.
Mouthpiece Caps
Use plastic mouthpiece caps if you use them during a performance or a recording session.
Doublers who must rapidly switch between instruments during a performance run the risk of dropping the cap.
Plastic mouthpiece caps make much less noise when dropped than the metal ones that seem to bounce on for quite some time. One musician I know has wrapped his caps in a thin layer of foam rubber for even greater sound deadening.
Bright, Metal Mouthpiece
If you have a metal mouthpiece that is a little too bright, alter its tone by putting a thin coating of silicone rubber on the mouthpiece’s interior.
This is easily accomplished by squeezing a small amount of silicone on a Q-TIP and carefully coating the interior of the mouthpiece. Take great care not to get any silicone on the side or tip rails of the mouthpiece. Immediately remove any accidentally placed silicone from the mouthpiece rails as it will greatly affect its playing response. The end effect is that the mouthpiece with the silicone interior sounds something like a hybrid between a metal and a plastic mouthpiece.
The nice thing about this little experiment is that it is completely reversible.
If you use a mouthpiece cushion on the beak of your mouthpiece, cut it to as small a size as practical. These cushions can greatly relieve the soreness and wear of the upper teeth from the constant contact with the mouthpiece. This can be especially so with metal mouthpieces.
The problem with these cushions is that they deaden the vibrations of the mouthpiece. The larger and thicker the cushion the more mass the vibrating reed must set into motion. I have found that a large mouthpiece cushion negatively affects the overall tone.
Have your mouthpiece professionally hand-finished. Very few commercially mass produced mouthpieces (even the expensive ones) come without flaws. Uneven side and tip rails and a mouthpiece table that is not completely flat greatly affect its response. Once a mouthpiece choice is settled on, having these flaws removed is well worth the money.
Reeds
Students often spend thousands of dollars on an instrument.
They ponder the advantages of certain brands and all the varieties of finishes etc. Further, they spent hundreds on mouthpieces, carefully noting which brand and facing their favorite professional musician uses.
However, they tend to take a fatalistic view when it comes to reeds. They may have a preference for a certain brand and reed strength but never bother to learn the intricacies of reed adjustment.
They are quite content to play a reed right out of the box accepting the common idea that only a few are of quality. I do not wish to be a commercial for a certain product but I highly recommend the purchase of Tom Ridenour’s method of single reed adjustment.
His book and DVD The Definitive Guide to Successful Reed Finishing clearly outlines a very simple method that makes most reeds quite playable. I also recommend Larry Guy’s book Selection, Adjustment and Care of Single Reeds. His method gradually breaks in a reed over a ten-day period.
I currently synthesize these two approaches and have not only saved money on reeds, but I have enjoyed an improved response and tone. As to other advice regarding reeds, I soak my reeds in water rather than saliva. I use a shot glass for this purpose.
While saliva works and is convenient, it is also what greatly contributes to a reed’s demise. The acid in one’s saliva can be quite detrimental to the longevity of a reed’s playing life. This is especially true if one has recently eaten. Rinsing one’s mouth before playing and soaking a reed in water will lessen the acid’s effect.
Tone Quality
Again it is not my place to endorse a certain product, but I feel the purchase of Dave Liebman’s book and DVD titled Developing a Personal Sax Sound is money well spent.
As stated above, students are willing to spend a great deal of money on equipment. Many become quite proficient technically with lots of “fingers” but ignore what should be primary, that is, a beautiful tone.
Dave Liebman’s approach works well for both classical and jazz saxophonists.
Unsolved Problem
One technical problem for which I haven’t found a simple solution is keeping a seldom used instrument at body temperature during a performance. A cold instrument plays flat.
Technically it’s not the cold instrument that makes it play flat, it’s the cold column of air inside the instrument that makes it play below pitch.
The old big band saxophonist’s used to call this the problem of trying to “play a hot lick on a cold stick”. If any aspiring inventor can find an easy way to keep the column of air inside the instrument warm he/she would eliminate the problem.
Perhaps some type of heated flute/ clarinet peg that would allow for a gentle convection of warm air to ascend through the bore of the instrument would do the trick. Any ideas? It would probably be marketable to a small contingency of doublers.
Conclusion
All of the above suggestions are just that-suggestions.
They are low-tech and inexpensive. Hopefully, you will find some of these suggestions helpful.
I’d very much like to hear from you with any of your ideas.
Till then, I’ll keep practicing and tinkering, much to the amusement of my students and chagrin of my wife and children. If I ever successfully put a supercharger on my tenor sax, I’ll send pictures. Good Luck.
Want more “low-tech” tips? Check out “Must Have Low Tech Gear for All Musicians.”
Also be sure to follow BetterSax on Facebook, Instagram, LinkedIn, and YouTube to stay up to date with us for news, giveaways, and other saxophone tips and tricks.